Brake pads: the cheapest part on your bike, and the one you'll regret ignoring
•7 min read

Quick answer: Replace brake pads when the friction material is under 1 mm thick (rim pads) or under 1.5 mm (disc pads), or when wear indicators reach the pad surface. Typical lifespan: rim pads 2,000–6,000 km, disc pads 1,000–3,500 km — but conditions matter more than mileage (wet/gritty rides can halve those numbers). Pads don't fail dramatically; they fade. Check at every chain replacement.
A set of brake pads costs less than a decent bidon. Yet they're the component most riders push past the safe wear point — usually without realising it, and sometimes with consequences that turn a €15 fix into a €150 one.
The reason is simple: pads don't fail. They fade. You adapt, your hand pulls the lever a little harder, your braking points shift a few metres earlier, and the whole thing feels normal until the day it doesn't.
Here's what's actually going on inside your calliper, the numbers worth knowing, and how to stop relying on intuition to manage a wear part.
The mileage question has no answer (but here are the ranges)
Search any forum and you'll find riders reporting wildly different pad lives. That's not noise — it's the actual range. Pad wear depends on rider weight, pad compound (resin vs sintered), terrain, weather, and braking style, and any one of those can move the number by a factor of three or more.
Some realistic ballparks from rider-reported data and brand guidance:
- Road, dry conditions: roughly 4,000–8,000 km per set, sometimes more for light riders who descend smoothly
- Gravel: 2,000–5,000 km, dropping fast in wet or dusty conditions
- MTB / trail: 500–2,000 km, with a wide spread depending on terrain
- E-bike / e-MTB: often half of the equivalent non-assisted figure, because the extra system weight loads the brakes harder
A single bad day can collapse those numbers. Riders have reported wearing a fresh set down to the backing plate in under 100 km of wet, gritty riding. The grit acts like sandpaper, and resin pads in particular don't survive much of it.
This is exactly why mileage alone is a poor trigger for replacement. It's a useful prompt to check, not a reason to swap.
What manufacturers actually say
The two numbers worth committing to memory:
Pads. Shimano specifies a minimum braking material thickness of 0.5 mm — about a credit card. SRAM frames it as total pad-plus-backing thickness: replace at 3 mm or less. Either way, when there's barely any compound left on the metal carrier, you're done.
Rotors. Most Shimano rotors start at 1.8 mm and have a minimum thickness of 1.5 mm stamped on them ("Min.TH=1.5"). SRAM rotors start at 1.85 mm with a 1.55 mm minimum. That's only 0.3 mm of usable wear before the rotor itself needs replacing — far less margin than the pad has.
The rotor minimum matters because that's where worn pads cost real money. Once the friction material is gone and the metal backing plate contacts the rotor, you're not just replacing a €15 pad — you're replacing a €40–€80 rotor too. Sometimes both, if you've been on a long descent.
What "fading" actually feels like
The Bicycling.nl piece on worn pads makes a point worth repeating: the danger isn't dramatic failure, it's the slow recalibration. A few signs the pads are well past their best:
- You're pulling the lever closer to the bar than you used to
- Stopping power feels fine in the dry but vanishes in the rain
- The bike judders or pulses under hard braking instead of biting smoothly
- A faint metallic scrape on long descents — the first audible sign the compound is nearly gone
- A high-pitched squeal when the wear-indicator slot disappears (on pads that have one)
If two or three of these are true, the pads are not "getting close" to needing replacement. They are at it.
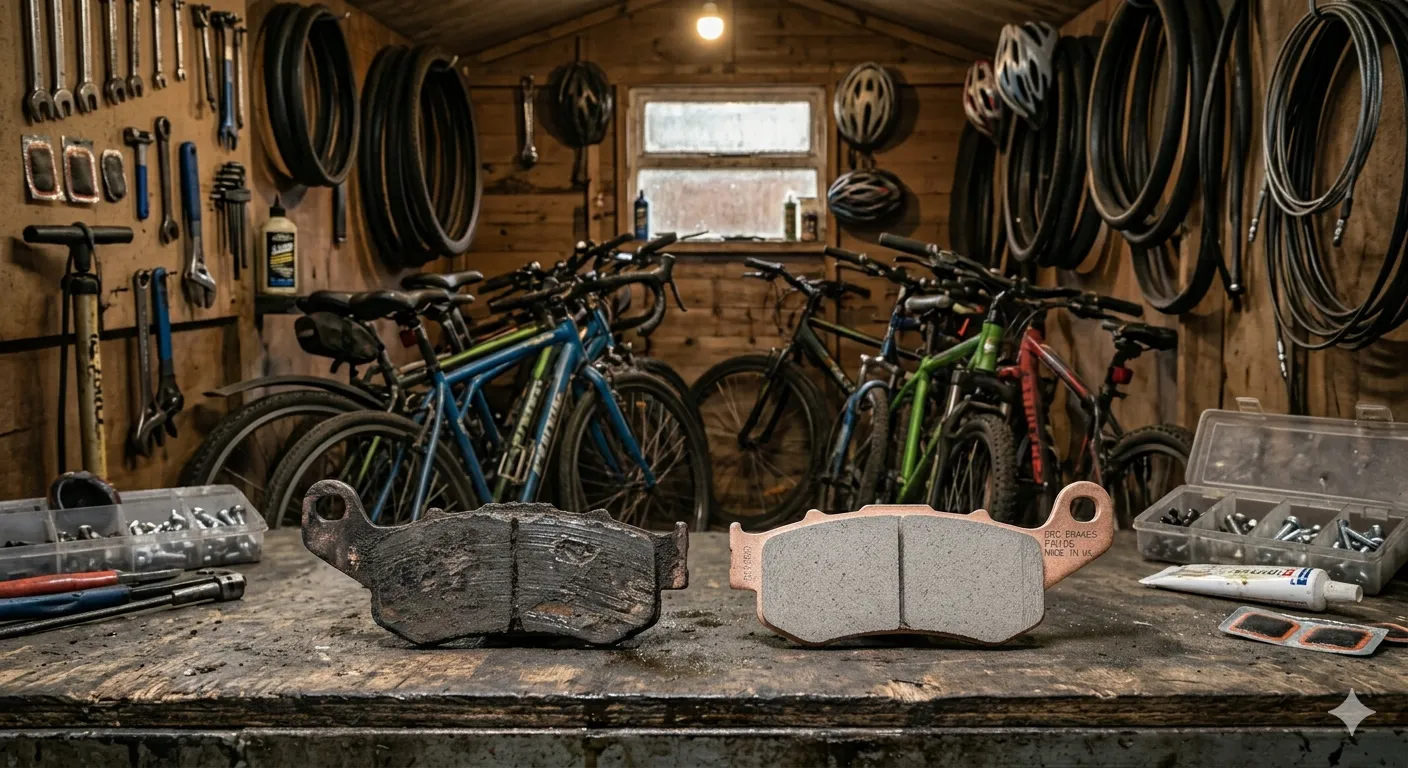
A worn pad (left) next to a fresh set (right). Side by side the difference is obvious — the trick is noticing before the dark sliver is all you've got left.
Why long descents are the worst place to find out
Brakes work by turning kinetic energy into heat. Healthy pads dissipate that heat across their full surface area. Worn pads have less material to absorb and shed heat, so temperatures climb faster — and once the pad compound overheats, friction drops. That's brake fade.
On a flat ride you'll never notice. On a 10-minute descent in summer, with worn pads and a loaded bike, you can lose a significant chunk of stopping power for the duration of the descent. Riders with rim brakes have an additional issue: enough heat can affect tyre pressure on the rim, and in rare cases blow a tube. Disc setups handle heat better, but a glazed or contaminated worn pad still drops bite considerably when it matters most.
The real problem: knowing when to look
Most riders don't ride past the wear point on purpose. They do it because brake pads don't show up in any list, calendar, or dashboard. They're invisible until something feels off — and by then you're already past the point where a clean swap would have done the job.
This is the gap WatchMy.bike is built to close. The platform tracks every component on every bike across its full lifecycle: install date, install distance, current distance, and the wear interval you set. When your front pads pass the threshold you defined — say, 4,000 km on the road bike — you get an alert. Not a guess. A specific, "these pads are due, here's the bike, here's the link to the ones you bought last time" alert.
A few things that make this work in practice rather than just in theory:
- Strava integration syncs distances automatically, so the number is real. No logging rides by hand.
- Components track separately from bikes. Move a wheel between two bikes and the rotor's history follows it.
- Custom links per component mean the product page, the LBS receipt, or the manual lives on the part itself. Reordering takes seconds.
- Free for up to three bikes, with unlimited components. If you want to test it on the bike you ride most, that's the use case it was designed for.
It's not magic. The platform doesn't measure your pads for you — nothing does that except a calliper and a look. But it removes the part most riders actually fail at: remembering to check in the first place.
A simple maintenance habit
If you take nothing else from this article:
- Set a check interval per bike, not per pad set. Every 1,000 km on the road bike, every 500 km on the gravel/MTB, every ride after a wet or muddy outing.
- Pull a wheel and look. Pads should still have visible compound above the backing plate. If the slot is gone or the material is sub-millimetre, replace.
- Measure the rotor when you swap pads. Calipers cost €10. If the braking surface is at or below the stamped minimum, the rotor goes too — and a fresh pad on a worn rotor never beds in properly anyway.
- Keep a spare set in the tool drawer. Pads are cheap and small. The cost of having them on hand is roughly zero; the cost of not having them on a Sunday afternoon ride is your weekend.
The summary
Brake pads are the cheapest safety-critical part on your bike, and the easiest one to forget. The numbers are simple — 0.5 mm of compound left on a Shimano pad, 1.5 mm of rotor thickness, total pad assembly above 3 mm for SRAM. The hard part is noticing in time.
Track them like every other wear part, check them when the alert fires, and you'll never have the conversation where the mechanic shows you a grooved rotor and quietly adds €60 to the bill.
WatchMy.bike helps cyclists track bikes, components, and maintenance schedules across their full lifecycle. Free for up to three bikes, with automatic distance tracking via Strava. Start tracking →