Brake Fluid 101: When to Bleed Your Disc Brakes (and Why Mineral Oil and DOT Are Not Friends)
•12 min read
Quick answer: If your brake lever feels spongy, pulls closer to the bar than it used to, or fades on long descents, the fluid needs changing — a job called a "bleed." Change DOT fluid every year (it absorbs water and loses stopping power), and mineral oil every 1.5–2 years (it's more stable). The one rule you can never break: mineral oil and DOT fluid are not interchangeable. Putting the wrong one in your brakes destroys the seals and voids the warranty.
You're halfway down a long descent, feathering the brakes into a switchback you've ridden a hundred times. You pull the lever — and it sinks further than it should before anything happens. A firmer pump and it bites, but your stomach has already dropped. The brakes that felt rock-solid in the car park this morning suddenly feel vague.
That sinking lever is one of the few maintenance problems on a bike that can put you in the back of an ambulance. And unlike a worn chain — which gives you weeks of subtle warning — it shows up the day you actually needed your brakes.
The first time I bled a brake I thought it was going to be a properly difficult job. It isn't. The hard part isn't the work — it's that you only do it every year or two, so you forget the small steps in between. Take the pads out before you start. Keep a clean cloth within arm's reach. Don't be afraid to fail. That's most of it.
What stuck with me was the dirt. One of my hoses had quietly collected gunk inside, and the brake feel had gone off without me being able to point to when. A normal bleed wasn't doing much. I had to push and pull hard on the syringe — properly hard — and then a cloud of blackness suddenly showed up in the tube. Years of contamination finally coming out.
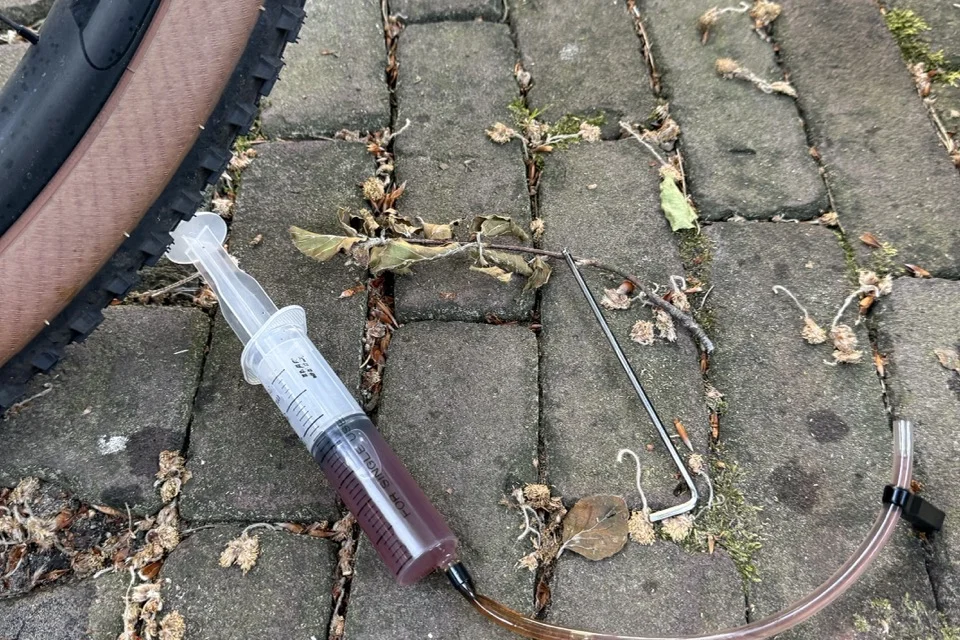
The actual cloud of blackness — years of contamination pulled out of a hose that had quietly gone bad.
I drained the whole system, refilled it with fresh fluid, and the brake was back. It's also why I now keep a full one-litre bottle on the shelf instead of the little sachets — once you've seen what comes out of an unhealthy hose, you want enough fluid on hand to flush properly rather than just top up.
What "Bleeding" Actually Means
Hydraulic disc brakes work because liquid doesn't compress. When you squeeze the lever, you push fluid down a sealed hose, and that pressure forces the caliper pistons to clamp the pads onto the rotor. As long as the system is completely full of fluid with no air in it, the lever feels firm and every bit of your hand strength reaches the wheel.
The problem is air and old fluid. Air bubbles do compress — so when a bubble works its way into the system, part of your lever squeeze gets wasted squashing that bubble instead of clamping the rotor. The result is the spongy, sinking lever that scared you on the descent.
"Bleeding" the brakes means pushing fresh fluid through the system to flush out the old fluid and any trapped air, leaving the lines completely full and solid again. Despite the dramatic name, no blood is involved — just brake fluid, a syringe or funnel, and some patience.
The Two Fluids: Mineral Oil vs DOT (and Why It Matters)
Before you touch anything, you need to know which fluid your brakes use. This is the single most important thing in this entire article, so read it twice.
There are two completely different families of brake fluid, and they are not interchangeable. They use different seal materials, and pouring one into a system designed for the other will swell and destroy the rubber seals, cause corrosion, ruin the brake, and void your warranty. There is no "close enough."
Which brand uses what?
| Fluid type | Brands that use it |
|---|---|
| Mineral oil | Shimano, Magura, Campagnolo, Tektro / TRP, Clarks, Promax, SRAM DB8, some Formula |
| DOT fluid | SRAM (everything except the DB8), Hope, Hayes, most Formula |
When people casually say "changing the oil in the brakes," they're usually talking about a mineral oil system — most often Shimano, which is by far the most common brake on the road and gravel bikes we see. But plenty of bikes run DOT, so always check before you buy fluid. If you're not sure, the lever or a sticker on the bike usually says, and the manufacturer's website always does.
How they behave differently
The two fluids don't just need different seals — they age in completely different ways, and that changes how often you need to service them.
DOT fluid is hygroscopic — it absorbs water from the air. It pulls in roughly 2–3% of its volume in moisture per year, even through the hose walls. This matters because water boils at a much lower temperature than brake fluid. Fresh DOT 5.1 boils at around 270°C, but once it's absorbed some water that drops to around 190°C. On a long, hard descent your brakes can get hot enough to boil that contaminated fluid — and boiling fluid creates vapour, which compresses, which is exactly the spongy, fading lever you don't want at the bottom of a mountain. DOT is also corrosive: spill it on your frame and it can lift the paint, so any spills get wiped up immediately with isopropyl alcohol.
One more DOT warning: Use only the DOT grade your brake specifies (usually DOT 4 or DOT 5.1). Never use "DOT 5" — despite the name, it's silicone-based and incompatible.
Mineral oil is not hygroscopic — it doesn't absorb water. That makes it far more stable over time, which is why mineral-oil brakes need bleeding less often. It's also non-corrosive, so it won't hurt your paint. The trade-off: mineral oil isn't a regulated standard the way DOT is, so each brand's formula is slightly different. Shimano brakes want genuine Shimano mineral oil, Magura wants Magura "Royal Blood," and so on — don't assume one bottle of mineral oil fits all.
How to Tell Your Brakes Need a Bleed
You rarely need a calendar to tell you — the lever tells you. Watch for any of these:
- Spongy or "squishy" lever feel. The lever moves a lot before the brake bites, and it feels soft rather than firm.
- The lever pulls closer to the bar than it used to. If you find yourself running out of lever travel — or the lever touches the grip in a hard stop — there's air in the system.
- You have to pump the lever to firm it up before it works properly.
- An inconsistent bite point — sometimes the brake grabs early, sometimes late.
- Brake fade on long descents — the brakes get progressively weaker as they heat up (a classic sign of moisture in DOT fluid boiling).
- Dark, dirty fluid — if you've opened the system and the fluid looks murky instead of clear, it's overdue.
If you notice any of these, don't put it off. Brakes are the one system on your bike where "I'll sort it next week" is the wrong answer.
How Often Should You Change Brake Fluid?
There's no single number, because it depends on your fluid type, how much you ride, and the conditions. But here are sensible intervals to plan around:
| System | Bleed / fluid change interval |
|---|---|
| DOT fluid (SRAM, Hope, Hayes…) | At least once a year; sooner if you ride hard, race, or do lots of big descents |
| Mineral oil (Shimano, Magura…) | Every 1.5–2 years, or 2–3 seasons; sooner if the lever feel deteriorates |
| Any system | Immediately, regardless of date, if the lever goes spongy or fades |
The reason DOT needs more frequent attention comes straight back to that water absorption: even if you barely ride, the fluid is quietly pulling in moisture and losing its high-temperature performance. Mineral oil sitting in a sealed system is much happier being left alone — but it's not immune to contamination, and the lever feel is always the final word.
Heavy mountain bikers, anyone riding long alpine descents, and e-bike riders (heavier bikes mean more braking energy and heat) should lean toward the shorter end of every interval.
The annual-bleed myth. Plenty of shops will quote you for a mineral-oil bleed every spring like clockwork, regardless of how the brake actually feels. That's not a service interval — that's a billing model. A Shimano lever that still snaps to a firm bite at eighteen months, with no fade on long descents, doesn't need fluid changed because the calendar flipped over. The lever is the boss, not the calendar.
DOT is a different story. That chemistry isn't optional — the fluid is genuinely drinking water from the air whether you ride or not. Annual is annual.
Doing It Yourself: What's Involved
As I said up top, a brake bleed is more forgiving than it sounds the first time. But it's brake-specific, and the consequences of getting it wrong are higher than most jobs on a bike — so go in respectfully. If you're not comfortable, a shop bleed is money well spent. If you want to learn, here's the shape of the job — always follow the official manual for your exact brake (Shimano, SRAM, and Magura all publish detailed step-by-step guides and bleed kits).
What you'll need
- The correct brand-specific bleed kit (funnel and/or syringes that fit your brake)
- The correct fluid — mineral oil or DOT, matched to your brake (and the right grade)
- Hex wrenches and a torque wrench
- Bleed blocks (the plastic spacers that go where the pads sit)
- Gloves and eye protection — non-negotiable for DOT, sensible for everything
- Isopropyl alcohol, clean rags, and a container to catch waste fluid
- A repair stand
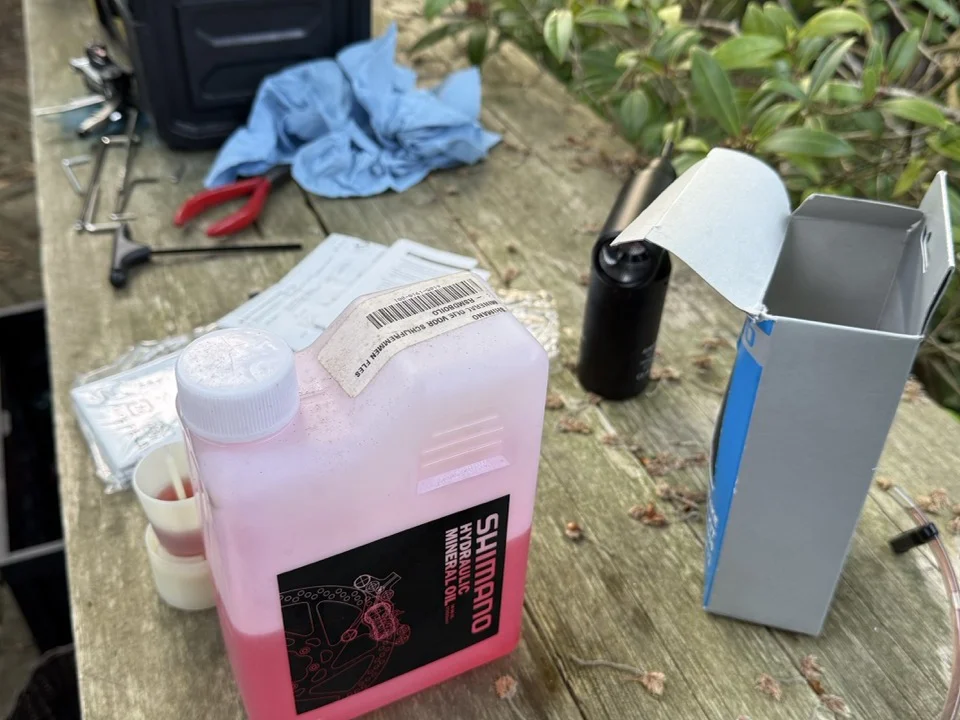
Shimano's 1-litre bottle of genuine mineral oil — cheaper per millilitre than the little sachets, and the only honest answer when a brake actually needs a full flush rather than a top-up.
The procedure, in plain terms
- Protect the pads and rotor first. Remove the wheel and the brake pads, push the pistons back, and insert the bleed block. Any oil or fluid that touches a pad or rotor will permanently contaminate it — contaminated pads squeal, lose power, and usually have to be replaced. This step is the whole ballgame.
- Position the bike so the lever's bleed port is the highest point — air rises, and you want it to travel up and out.
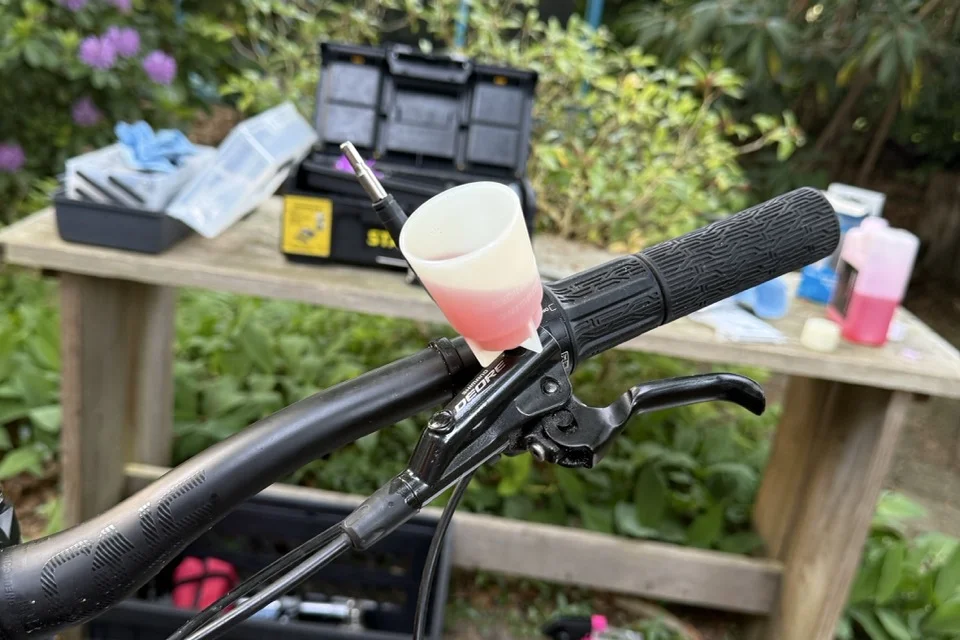
- Attach the kit — typically a funnel or syringe at the lever, and a syringe or catch hose at the caliper bleed nipple.
- Push fresh fluid through the system, usually from the caliper up to the lever, flushing the old fluid and pushing air out. You'll watch for bubbles coming through and keep going until the fluid runs clean and bubble-free.
- Burp the remaining air — gently working and tapping the lever and hose dislodges the last stubborn bubbles clinging to the inside of the system.
- Close everything to the correct torque, clean every trace of fluid off the brake with isopropyl alcohol, then reinstall the pads and wheel.
- Test before you ride. Pump the lever until it's firm, check it holds pressure, and do a slow rolling stop in a safe place. Never ride a bike whose brakes you've just bled without testing them first.
The mistakes that cost the most
- Contaminating the pads or rotor. Worth repeating, because it's the most common and most expensive mistake. Oil on a pad is usually fatal to the pad.
- Using the wrong fluid. Re-read the fluid section. This one can wreck the whole brake.
- Leaving air in the system because you rushed the burping step — and ending up with a lever that's no better than when you started.
- Skipping eye protection with DOT. It's genuinely nasty stuff for your eyes and skin.
How WatchMy.Bike Keeps You Ahead of It
The tricky thing about brake fluid is that, unlike a chain, the warning signs are subtle and easy to rationalise away — until the descent where they aren't. And because the right interval is mostly about time (especially for DOT, which degrades on the calendar whether you ride or not), it's exactly the kind of job that slips through the cracks.
That's the gap WatchMy.Bike is built to close. Track each brake as a component, and set a recurring service reminder so the bleed comes to you instead of you having to remember it.
A simple setup that works for most riders:
- "Bleed brakes" — recurring every 12 months for DOT systems, or every 18–24 months for mineral oil
- "Check lever feel" — a lighter recurring reminder to actually squeeze the levers and notice any sponginess before a big trip
- Log the date and fluid type in the notes each time you bleed, so you always know what's in the system and when it last had attention
If you run multiple bikes, this is where it really pays off — your race bike, your winter bike, and your partner's gravel bike all reach their service window at different times, and WatchMy.Bike keeps track of each one separately so nothing gets forgotten.
Set up your first maintenance reminder →
Not sure which fluid your brakes use, or whether it's time for a bleed? Reach out at marien@WatchMy.Bike.