How to Replace Handlebar Tape: The Contact Point Everyone Ignores
•7 min read
Quick answer: Replace your handlebar tape once or twice a year if you ride regularly — sooner if it's unraveling, gone hard and slick, or soaked through after a crash. Wrap the right side clockwise and the left side counter-clockwise, start from the bar end working inward, and overlap each turn by about half the tape's width. The whole job takes 20–30 minutes and costs €15–40 in tape.
You reach for the drops on a fast descent and your hand slides. Not far — just enough that you grip harder than you should, white-knuckle through the corner, and tell yourself the tape is "fine." It isn't. That slick, shiny strip under your palm used to have texture. Months of sweat, sun, and road grime polished it smooth, and you've been quietly compensating ever since.
Bar tape is one of only three contact points between you and the bike — the others being your saddle and your pedals. Nobody hesitates to replace a worn saddle or shot cleats. Yet tape gets ridden until it's literally falling off the bar, because it's cheap, it's cosmetic-looking, and nothing dramatic happens when it ages. The failure is invisible right up until your hand slips at the worst possible moment.
When Tape Is Actually Done
There's no kilometre threshold for bar tape the way there is for a chain. It wears by exposure and contact, not distance, so the signals are tactile and visual rather than measured. Replace it when you hit any of these:
| Sign | What it means |
|---|---|
| Unraveling at the bar end or tops | The adhesive has let go — this is a safety issue, not cosmetics |
| Smooth, hard, slick surface | The cushioning compound is spent; grip and vibration damping are gone |
| Visible tears, splits, or thinning | Sweat and UV have broken down the material |
| Permanently grimy or sweat-soaked | Especially after indoor trainer use, where salt destroys tape fast |
| After any crash | Check for hidden tears and re-wrap if the bar took an impact |
For frequent riders, that usually lands at every 6 to 12 months. Cheap synthetic tape can be slick within three months; good cork or padded tape, kept clean, can go two years or more. The material and your sweat chemistry matter more than your mileage.
The "it's fine" myth: Tape doesn't fail loudly, so riders treat it as the lowest-priority part on the bike. But it's the only part you grip for the entire ride. A worn saddle you sit on; worn tape you steer and brake with. If you'd replace slick tires for grip, the logic applies just as hard to the thing your hands actually hold.
What You Need
- One roll of bar tape (most come as a pair with two finishing strips, two bar plugs, and two small patches for behind the levers)
- Scissors or a sharp knife
- Electrical tape or fiber tape to anchor brake/shifter housing
- 15–30 minutes and a little patience on your first wrap
Wrapping Drop Bars, Step by Step
The single rule that makes a clean wrap: wrap so the tape tightens as you ride, not loosens. Your hands push outward on the drops, so each side spirals in the opposite direction.
- Right side: clockwise (looking at the bar end)
- Left side: counter-clockwise
Get the direction wrong and the tape peels open within a few rides no matter how tight you pull.
- Anchor the housing first. Tape the brake and shifter cables to the bar with a couple of small wraps of electrical tape so they sit flush. Loose housing makes a lumpy wrap.
- Start at the bar end. Let about half the tape's width overhang past the end of the bar — you'll tuck this in later to anchor the plug. Begin wrapping forward (toward the stem).
- Keep steady tension and overlap by half. Pull firmly enough to stretch the tape slightly, and overlap each turn so roughly half the tape covers the previous wrap. Consistent tension is what separates a pro-looking wrap from a baggy one.
- Handle the brake lever. Peel back the rubber hood. The cleanest method is the figure-8: bring the tape up and over the bar above the lever clamp, around, and back below it, so no bare bar shows behind the hood. Many tape kits include a small backing strip to cover that gap — use it. (Park Tool documents three approaches here; the figure-8 uses the most tape but leaves the cleanest result.)
- Finish near the stem. Stop where the bar starts to bend or about 2–3 cm short of the stem clamp. Wrap two turns past your endpoint, then cut the tape at a clean diagonal so the end lies flat against the bar.
- Secure the end. Wrap the included finishing tape (or electrical tape) two or three times over the cut edge, pulling tight.
- Tuck and plug. Push the overhanging tape at the bar end into the tube, then press the bar plug in firmly to trap it. A plug that won't stay seated usually means not enough tape was tucked in.
Repeat on the other side, remembering the mirrored direction. Step back and check both sides match in where they start, end, and how the hoods look — symmetry is the tell of a good job.
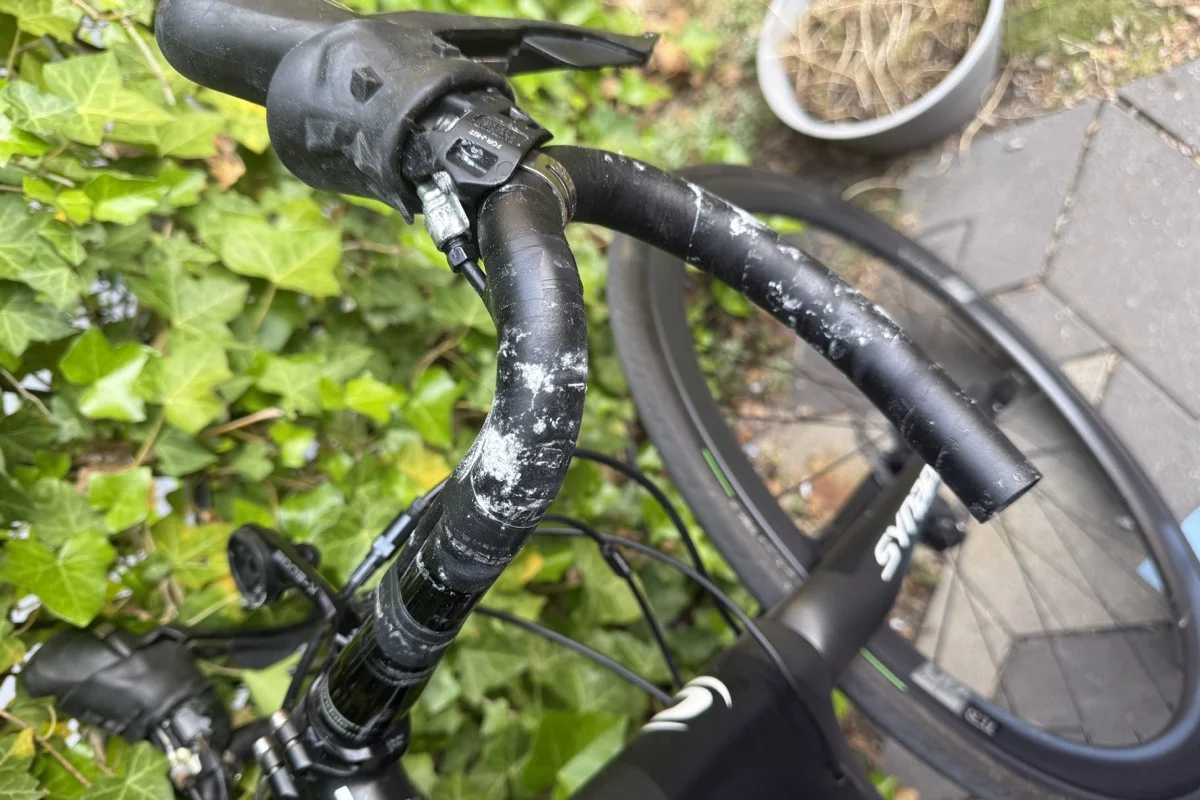
This is the walkthrough I actually followed when I re-taped the bars in the photo above — watching the hood wrap happen in real time made it click far faster than any written step could.
That photo at the top of this post is my own bike — the black tape gone chalky white with dried sweat-salt, worst on the drops where my hands actually sit. It didn't get there overnight, and that's the trap: I rode it for months telling myself it was "fine" because nothing about it felt sudden. It wasn't fine. The salt is the tape giving up, one ride at a time.
A Few Things That'll Save You Grief
- Don't over-stretch near the end of the roll. People run short and pull the last section thin to make it reach. Plan your overlap so you finish with tape to spare.
- Light-coloured tape shows everything. White and cream look fantastic for about a week. If you sweat heavily or ride dirty roads, dark tape stays presentable far longer.
- Trainer riders, check more often. Sweat dripping onto the same spot for hours corrodes tape and the bar underneath. Indoor-heavy riders can need fresh tape twice as often as outdoor riders.
- Re-tape after a crash even if it looks okay. You're inspecting the bar for damage as much as replacing the tape — a hidden hairline in an alloy or carbon bar is far more dangerous than slick tape.
For more on the contact points and small parts that quietly degrade, see where that mystery creak actually comes from.
How WatchMy.Bike Makes This Automatic
Bar tape is the textbook "out of sight, out of mind" job. It doesn't trip a chain checker or skip a gear — it just slowly gets worse, so it slips off everyone's mental maintenance list. That's exactly the kind of time-based task WatchMy.Bike is built to remember for you.
Because tape wears by time and exposure rather than distance, set a time-based interval instead of a distance one:
- "Replace bar tape" — recurring every 12 months (every 6 months if you sweat heavily or ride a lot indoors)
- "Inspect bar tape & hoods" — recurring every 3 months, a 30-second check for unraveling and slick spots
Add it as a service interval on your bike and the reminder lands before your hand starts slipping on descents — not after.
Set up your first maintenance alert →
Questions about bar tape or any other contact point? Reach out at marien@WatchMy.Bike.